
Collaborate tells you that you look great when it is receiving your video. Click the Refresh button on the site to apply the changes. Click the Lock icon next to the website link in the address bar. Select a different camera and/or microphone if necessary. A prompt will appear when your browser is trying to access Camera/Mic. If you are streaming from Chrome, Firefox, etc. in a web browser, you may encounter an issue where your Camera/Microphone is blocked by the browser.
If the issue seems to occur only on a specific network, your internet connection is likely causing the issue. Open your notification Action Center and click the Quiet Hours button to disable notifications until you tap the button again. Or, just right-click the notifications icon in your system tray, and select Turn on quiet hours. On your Mac, just tap the notifications icon in the top right of your menubar and scroll down to reveal the Do Not Disturb option. Tap it to turn it on—and you won’t get any notifications until you turn it back on.
What are the common microphone fails on Windows 10?
After speaking some lines hit “stop recording” and wait for a window to open automatically to save this recording. You can write the name of this file and save it an easy-to-access location. If you want to fine-tune the way your microphone sounds, you’ll need third-party audio software. While there are many options available, Equalizer APO is one of the easiest to use and is free to boot. However, Equalizer APO on its own is a command-line tool, but there are a number of free graphical user interfaces you can install, which makes using the program much easier. From time to time, you might consider which apps actually have access to your microphone.
- The tabletop and surrounding area must be clear of all items not approved for use during the test, including cell phones , cameras, notes and study materials.
- It is possible to pair AirPods with multiple devices – partly thanks to iCloud – but they can only handle one active Bluetooth connection at a time.
- So, you need to check and grant access to Windows privacy settings.
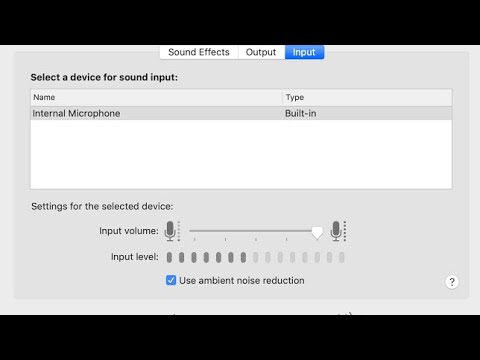
To update Zoom, click the Profile icon at the top-right corner and select Check for Updates from the menu. If your headphone or external microphone has a dedicated mute button, check that it hasn’t been toggled on by accident. Low input volume has been a problem for many users, thankfully it is just a setting and you can easily change it back to normal. To adjust input volume, open System Preferences and navigate to Sound. In the Input tab, you can set the input volume depending on your need, the higher the better.
Fix: There was an error trying to activate your camera or microphone
You might be mistaken to think that there might be one near the camera, but it is not the case. Microphones on MacBook Pros have always been situated on the bottom casing, near the speakers, or on top of the keyboard area. The location of microphones on MacBook Pros has changed over time so the location varies depending on the version/year of MacBook Pro you have. The microphones are located in the upper right portion of the keyboard and speakers section of the MacBook Pro and in the left speaker grille for the Macbook Air.
You can share the troubleshooting steps below with other members of your Zoom meeting. They may be muted, or may not have connected their audio. Once you’ve got your audio working correctly, you can also make sure you’re displaying the correct name by learning how to change your name on Zoom.
Webcams with unsatisfactory sensors struggle if a subject isn’t well lit, resulting in a fuzzy ‘static’ like interference known as background noise. We make note of how accurate the colors are in any recorded footage and the overall clarity of video and photographs taken on the webcam. It isn’t the most attractive webcam, but the LifeCam Studio isn’t really designed to be attractive.
This tool allows Windows to identify the potential reasons of the not-working issues and search for potential solutions. The next step is to ensure that your microphone is set as the default device. On the Recording tab, if a check mark appearing on your microphone mouse jiggler icon, it means your microphone’s already selected as the default device. Otherwise, right-click your microphone and tap “Set as Default Device” to set it as the default. The best way to test a microphone on Mac is to use a universal tool like an online mic tester.
